Categories
Business

5 Reasons to Employ Email Marketing Today

Have you been looking for ways to incorporate digital marketing strategies lately? Or do you just want to explore the world of online marketing? Email marketing could be the answer in either scenarios!

In this mayhem of corporate world, every company is battling with their competitors to acquire more and more conversions. There are numerous ways to generate leads and revenues and every business has their marketing strategies aligned right as per the books.
But do they know how things keep evolving as we go and how businesses take an unpleasant turn even if a single marketing strategy goes wrong. Apparently not! Experts know that marketing is paramount and this is why they pay maximum heed to it.

A marketing team finds the most valuable data to create enlarged constructive content such as blogs, infographics, videos and many more. In 1988, Nike launched a marketing campaign called ‘Just do it’ to promote sales. The campaign was so successful that today ‘Just do it’ has become Nike’s trademark. Need we say more about marketing?

With so many kinds of marketing strategies such as social media advertising, influencer marketing, content marketing, purpose driven marketing why do we want to talk about email marketing? Emails have been around the corner ever since the internet was introduced and almost everybody checks their emails today. Many would say that email marketing is obsolete today. We say NO as we see many top notch companies leveraging email marketing strategies to get a large number of leads.

So what exactly are these benefits that we keep talking about?

  1. Stronger and Loyal Customer Base – Having a strong email list means having a loyal customer following. Your social media followers might miss out on your recent content but your email list customers will take over as they signed up for your products in particular. When a customer signs up for your email list, they feel entitled to receive updates such as newsletters, new product or campaign launches.
  2. Brand Awareness – Email marketing techniques such as sending recommendations after a customer bought a product or sending customized emails when a new product/ campaign is launched, etc. are sublime ways to acquaint more customers with your business. Typically marketing experts add a ‘call to action’ button in their emails with a captivating one liner to encourage the customer to click. These tactics are proven methods, which eventually increases brand awareness and click-through-rates.
  3. ROI – It has been observed that emails are 40% more effective than any other social media platform. As per Constant Contact, when a business spends $1 on email marketing, they receive a revenue of $38. Many marketing opportunists are already aware of this fact and have achieved laudable goals such as highest conversion rates, wider audience reach, increased click-through-rate (CTR) on their website and an increased ROI out of their online business.
  4. Cost Effective – If you have a budget set aside for marketing purposes, you may want to consider email marketing. Since the customer following is usually dynamic, it is rather easier to recreate, redesign, and re-purpose your content with an allocated budget.
  5. Direct Reach – Receiving an email with “Hello” or “Hello Dave”, which sounds better? The one with your name, right? Such email tactics ensure that the customer feels valued enough. Email marketing is a tried and tested method, which allows you to segment your customers as per demographic trends. And this works brilliantly in reaching out to a targeted audience.

Having a business with great revenue is excellent but building a valuable relationship with your customers is even better. If you have not been able to utilize email marketing yet, the time is now because ‘better late than never’.

Categories
General

Publishing Over CMS! Is It a Right Decision to Take?

Is that what you are thinking right now?

You hear on the grapevine the benefits of publishing over a Content Management System and suddenly realize the need for it. But are you still confused with the technicalities involved as what it is exactly and whether it is possible for you to handle such application?

Just put your worries back in the Pandora’s Box and understand the know-how of Content Management System fondly known as CMS in the tech world.

Starting with what exactly is a Content Management System?

CMS is a computer application that supports the creation and modification of digital content. This application makes you the kingpin as it gives you total control over your content. You can edit your blog whenever you want right from a single comma to the many pages full of wonderful content you write.

Moreover, CMS helps your content stay up-to-date and tidy as opposed to the stale content which becomes a major turn-off. As your work stays updated, it helps to increase the number of visits to your blog eventually making your content reach the rightful audience. This application is furthermore easy to use leaving no space for those many complications that can rip off your mind if you are not acquainted with the technicalities involved.

Also, a Content Management System provides various templates (both paid and free) which help you create your own unique design harmonious with your writing without getting you confused each time which font style or size to use. You can just select the template and there you go bang with a unique style of yours plus saving much of your time!

Along with the benefits mentioned above, CMS has an additional advantage of helping you boost your search engine rankings. Most of the CMSs offer several add-ons/modules/plugins that help the search engine crawlers access and understand your content. This, in turn, makes your content discoverable over the web, eventually building a strong online presence for you.

Now, if you are wondering how to start with publishing over a Content Management System, the first step begins with choosing the right CMS. If you are new to this application, WordPress would be the perfect platform for you to start publishing without having to work from the scratch. It is the star and the most popular platform for publishing your work with its famous tagline of ‘5-minute install.’ The recent statistics say that 28% of the internet is powered by WordPress. Imagine the large exposure WordPress gives you!

WordPress has many benefits in stock for budding as well as established writers. Some of the notable advantages include:

  1. User-friendly
  2. Easy to install and manage
  3. Navigation-friendly interface
  4. Requires no or less technical knowledge
  5. Large community worldwide

WordPress helps your creativity strike the right chord with your audience. It’s your content and when you have the entire control over how your content will look like is surely a cherry on the top. Many big shots have chosen WordPress as their platform from Time Inc., The Walt Disney Company, Angry Birds, Vogue, Sony Music, LinkedIn and so on. This superstar platform is famous among many successful bloggers and celebrities increasing its popularity day by day. If you are a naïve user of CMS, WordPress is certainly your boon companion to help your amazing articles reach out to the millions. It goes with the jingle – You love writing and WordPress will love you back!

Conclusively, if you are a writer and looking forward to publishing your work, CMS is something you should learn about. Start publishing over a Content Management System and rule the creative world of content like a boss.

Categories
Beginner WordPress

WordPress: An Introduction To The Easiest & Most Powerful Content Management System

WordPress, the most popular and versatile Content Management System today, was initially released with one purpose of blogging. As soon as it arrived, users couldn’t stop gushing praise about it, which eventually created a fad among the users. Today, WordPress enables bloggers to create an entire website for themselves, which can easily be updated and modified.

There are over 1 billion websites on the internet and the giant platform covers ~31% of the internet today. That number is incredible. It has evolved from a publishing platform to a user-friendly CMS.

WordPress is easier for every individual, even for a layman because of its short learning curve, which has led WordPress to become the most distinguished and widely used CMS today. While the world is using WordPress, others are pining for it and the rest of them are just oblivious to its abilities. It would be unfair to say if WordPress entirely vanquished Joomla and Drupal as they are two of the most used CMSs. But every developer would concede that WordPress is the easiest CMS out there.

The best way to learn WordPress is to use it and get used to it, so let’s get to know WordPress a little more.

WordPress.Com v/s WordPress.Org?

TBH, WordPress.Com & WordPress.Org, both are a bit daunting for new users. Simply put, WordPress.Org is self-hosted and WordPress.Com is a service managed by Automattic (the company behind WordPress). WordPress is like any other software that can be downloaded and installed on your internet server. However, setting up an internet server itself, is a hectic job for a naïve user. That is where WordPress.Com helps you!

It is hypothesized that WordPress.Org & WordPress.Com are same entities. However, they are significantly different.

With WordPress.com, you sign up, set-up your profile, choose a theme and start blogging. Voila! That’s easy! A major plus point is that Automattic is managing all the “other-things” for the user. Things like hosting the site, performing backups & maintenance, security, spam control and performance optimization, etc. will all be a part of their job and not yours. All these tasks can be pretty much burdensome when you’re busy running a business or creating content.

This brings us to WordPress.Org, where all the things listed above will solely be your part to play. You will have to find a host and do a bang-up job of finding and setting-up a server, hosting the website, security, themes, plugins and backups and the rest of the stuff, for there’s no one else to pay heed to it, giving you more power, control and authority over your website. With WordPress.Org, it is more like taming your own animal which has rather more potential and you have the control to unleash that. You can always choose between thousands and thousands of themes, plugins, structure your website as and when you want and even scale-up your WordPress installation based on your performance requirements.

Themes & Plugins

WordPress has ever-growing number of themes and plugins which makes your website look pleasing and adds special features to it. Our developer explains “Your WordPress website is an HTML skeleton until you put some skin and clothes to it using themes and plugins“. That’s a good perspective, though. Using a theme, everything from background color to font could be extensively customized which changes the website’s appearance.

The best part about it is that there are free as well as premium (paid) themes. The only difference between a free and a premium theme is that the latter provides more features and functionality plus support than a free theme. Free themes are built to cater to a specific purpose and are meant to be installed, activated and use them as is, typically with some kind of limitation. This is one reason why developers prefer premium themes over free themes.

A plugin, generally helps to fulfill the need of an added functionality to a website. In WordPress fashion, there are various plugins to help you add a plethora of features to your website. For instance, to make sure your website stays safe from potential spam, malware and other attacks, you may want to install a security plugin on your website. A website may require a name-your-fantasy feature, or a pop-up that’s when those plugins come to your rescue.

Power of WordPress

WordPress is multilingual and is available in more than 70 languages. Its one-click installation and upgrade is worth it. WordPress has an enthusiastic and open community where developers from around the world collaborate and enjoy discussions on its features. It’s an easy task to customize and change the appearance of your site using themes and plugins. The extensibility of WordPress has a vast horizon because of the various plugins available.

WordPress offers you the flexibility to create any kind of  website not limited to blogging, photography or a personal website but a full-fledged website such as an eCommerce store, news or government website.

Publishing a post and creating a page are two tasks which can be performed effortlessly. WordPress provides the facility to create posts and schedule them, protect them with a password (if required) and what not. It lets you make your content public or private. When the website grows, there may be a need for multiple users to collaborate and manage it, in such a case, you can add and assign roles to users such as administrators, authors, editors, etc.

These are just the basics of WordPress and there is so much more to WordPress. Today, WordPress is not only a blogging tool, it has evolved into a platform which can help you power your business online and establish your online presence. And there is enough room for limitless opportunities when it comes to developing with WordPress.

Besides this, most of the brands like Time Inc., The New Yorker, LinkedIn, Sony Music, Forbes, etc. are already using WordPress to build and grow their businesses.

Are you using WordPress yet? If not, you’re missing out on something big. And for the ones who are into WordPress, your game is up and strong.

Happy Blogging!

Categories
WooCommerce WordPress

Adding and Sending Custom WooCommerce Email (without a plugin)

This tut has been updated to work with WooCommerce 3.0+. Read how can you add and send custom WooCommerce email for WooCommerce version 3.0 and higher.

Emails are pretty important when you have customers purchasing products from your online store. Customers buying your products (even us, when we make an online purchase), be it physical or virtual, expect to receive some sort of emails about the confirmation of payment, the processing of order and so on. If your store fails to do so, you’re probably doing it wrong and making your business suffer. Because, the customer has just sent you his money and they’ve not yet heard back from you, they’ve not received a payment confirmation. Get the problem?

If you’re selling with WordPress & WooCommerce, things are quite easy for you as a store owner/manager. WooCommerce, by default, sends out some emails to let your customers know that their order has been placed, processed and/or is complete. However, sometimes it may happen that based on the products you’re selling, you may need to send out custom emails to the customers once they’ve placed an order on your site.

Practical Example

For instance, let’s say, you have a WordPress & WooCommerce powered online store that allows customers to purchase a course on your website and in-turn grants them access to your online training program.

In such a case, you may want to send out a Welcome Email to the customers informing them about the purchase and sharing access details for the online training program. In order to be able to do so, we’ll need to add a custom WooCommerce email that triggers every time a new order is placed on the site. WooCommerce 2.0 introduced a whole bunch of new features, including the ability to add a new class-based implementation for emails. In this article, we’ll use the WooCommerce email class implementation to add a custom email which is triggered on every new order once the payment has been received.

Side Note

The example cited above may also require custom implementation that allows interaction between WooCommerce and (possibly the API to connect to) your online training program to allow adding new user accounts when a customer makes a purchase at your online store. This article does not cover the integration to a third-party service part, and is strictly intended to guide you on how can a custom email be added and sent through your WooCommerce store.

Implementation

Duh.. Enough Talk! Let’s Implement That

Implementation of custom email is divided into three phases:

  1. Extending WC_Email class to define the email header, subject, email template for content, etc.
  2. Adding our custom email class to the default WooCommerce email classes using woocommerce_email_classes filter
  3. Creating our own email template to be used to generate email content for our custom email.

Let’s get started.

First things first!

It is highly recommended that any customization be kept separate from the theme. A plugin like WP Designer could come in handy if you want to add such a customization. This example requires you to FTP into your website and create custom directories and files inside wp-content > uploads directory. Following is a list of directories and files that need to be created:

  1. Create directory crwc-custom-emails inside wp-content > uploads.
  2. Create file crwc-email-functions.php in the root of crwc-custom-emails directory (crwc-custom-emails > crwc-email-functions.php).
  3. Create file class-crwc-welcome-email.php in the root of crwc-custom-emails directory (crwc-custom-emails > class-crwc-welcome-email.php).
  4. Create a sub-directory emails inside crwc-custom-emails directory.
  5. Create a new file crwc-welcome-email.php inside the emails directory (crwc-custom-emails > emails > crwc-welcome-email.php).
  6. You can also choose to create a sub-directory plain inside emails directory and then create crwc-welcome-email.php file inside plain directory (crwc-custom-emails > emails > plain > crwc-welcome-email.php). This will be used in case emails use plain content-type.

Building custom email class

The custom email class that we create would actually define the email trigger plus the email content. We can extend the default WC_Email class and hence make use of all of the parent email class methods & members that are available. This makes life really easy 😉

Add the following code to class-crwc-welcome-email.php file.

<?php

if ( ! defined( 'ABSPATH' ) ) exit; // Exit if accessed directly

/**
 * Welcome Email class used to send out welcome emails to customers purchasing a course
 *
 * @extends \WC_Email
 */

class CRWC_Welcome_Email extends WC_Email {
	
	/**
	 * Set email defaults
	 */
	public function __construct() {

		// Unique ID for custom email
		$this->id = 'crwc_welcome_email';

		// Is a customer email
		$this->customer_email = true;
		
		// Title field in WooCommerce Email settings
		$this->title = __( 'Welcome Email', 'woocommerce' );

		// Description field in WooCommerce email settings
		$this->description = __( 'Welcome email is sent when an online training program account is created for the customer after the purchase of the online course.', 'woocommerce' );

		// Default heading and subject lines in WooCommerce email settings
		$this->subject = apply_filters( 'crwc_welcome_email_default_subject', __( 'XYZ Online Training Program', 'woocommerce' ) );
		$this->heading = apply_filters( 'crwc_welcome_email_default_heading', __( 'Welcome to Online Training Program', 'woocommerce' ) );
		
		// these define the locations of the templates that this email should use, we'll just use the new order template since this email is similar
		$upload_dir = wp_upload_dir();
		
		$this->template_base  = $upload_dir['basedir'] . '/crwc-custom-emails/';	// Fix the template base lookup for use on admin screen template path display
		$this->template_html  = 'emails/crwc-welcome-email.php';
		$this->template_plain = 'emails/plain/crwc-welcome-email.php';

		// Trigger email when payment is complete
		add_action( 'woocommerce_payment_complete', array( $this, 'trigger' ) );
		add_action( 'woocommerce_order_status_on-hold_to_processing', array( $this, 'trigger' ) );
		add_action( 'woocommerce_order_status_on-hold_to_completed', array( $this, 'trigger' ) );
		add_action( 'woocommerce_order_status_failed_to_processing', array( $this, 'trigger' ) );
		add_action( 'woocommerce_order_status_failed_to_completed', array( $this, 'trigger' ) );
		add_action( 'woocommerce_order_status_pending_to_processing', array( $this, 'trigger' ) );
		
		// Call parent constructor to load any other defaults not explicity defined here
		parent::__construct();

	}


	/**
	 * Prepares email content and triggers the email
	 *
	 * @param int $order_id
	 */
	public function trigger( $order_id ) {

		// Bail if no order ID is present
		if ( ! $order_id )
			return;
		
		// Send welcome email only once and not on every order status change		
		if ( ! get_post_meta( $order_id, '_crwc_welcome_email_sent', true ) ) {
			
			// setup order object
			$this->object = new WC_Order( $order_id );
			
			// get order items as array
			$order_items = $this->object->get_items();

			//* Maybe include an additional check to make sure that the online training program account was created
			/* Uncomment and add your own conditional check
			$online_training_account_created = get_post_meta( $this->object->id, '_crwc_user_account_created', 1 );
			
			if ( ! empty( $online_training_account_created ) && false === $online_training_account_created ) {
				return;
			}
			*/

			/* Proceed with sending email */
			
			$this->recipient = $this->object->billing_email;

			// replace variables in the subject/headings
			$this->find[] = '{order_date}';
			$this->replace[] = date_i18n( woocommerce_date_format(), strtotime( $this->object->order_date ) );

			$this->find[] = '{order_number}';
			$this->replace[] = $this->object->get_order_number();

			if ( ! $this->is_enabled() || ! $this->get_recipient() ) {
				return;
			}

			// All well, send the email
			$this->send( $this->get_recipient(), $this->get_subject(), $this->get_content(), $this->get_headers(), $this->get_attachments() );
			
			// add order note about the same
			$this->object->add_order_note( sprintf( __( '%s email sent to the customer.', 'woocommerce' ), $this->title ) );

			// Set order meta to indicate that the welcome email was sent
			update_post_meta( $this->object->id, '_crwc_welcome_email_sent', 1 );
			
		}
		
	}
	
	/**
	 * get_content_html function.
	 *
	 * @return string
	 */
	public function get_content_html() {
		return wc_get_template_html( $this->template_html, array(
			'order'			=> $this->object,
			'email_heading'		=> $this->email_heading( $this->course_info['program'] ),
			'sent_to_admin'		=> false,
			'plain_text'		=> false,
			'email'			=> $this
		) );
	}


	/**
	 * get_content_plain function.
	 *
	 * @return string
	 */
	public function get_content_plain() {
		return wc_get_template_html( $this->template_plain, array(
			'order'			=> $this->object,
			'email_heading'		=> $this->email_heading( $this->course_info['program'] ),
			'sent_to_admin'		=> false,
			'plain_text'		=> true,
			'email'			=> $this
		) );
	}


	/**
	 * Initialize settings form fields
	 */
	public function init_form_fields() {

		$this->form_fields = array(
			'enabled'    => array(
				'title'   => __( 'Enable/Disable', 'woocommerce' ),
				'type'    => 'checkbox',
				'label'   => 'Enable this email notification',
				'default' => 'yes'
			),
			'subject'    => array(
				'title'       => __( 'Subject', 'woocommerce' ),
				'type'        => 'text',
				'description' => sprintf( 'This controls the email subject line. Leave blank to use the default subject: <code>%s</code>.', $this->subject ),
				'placeholder' => '',
				'default'     => ''
			),
			'heading'    => array(
				'title'       => __( 'Email Heading', 'woocommerce' ),
				'type'        => 'text',
				'description' => sprintf( __( 'This controls the main heading contained within the email notification. Leave blank to use the default heading: <code>%s</code>.' ), $this->heading ),
				'placeholder' => '',
				'default'     => ''
			),
			'email_type' => array(
				'title'       => __( 'Email type', 'woocommerce' ),
				'type'        => 'select',
				'description' => __( 'Choose which format of email to send.', 'woocommerce' ),
				'default'       => 'html',
				'class'         => 'email_type wc-enhanced-select',
				'options'     => array(
					'plain'	    => __( 'Plain text', 'woocommerce' ),
					'html' 	    => __( 'HTML', 'woocommerce' ),
					'multipart' => __( 'Multipart', 'woocommerce' ),
				)
			)
		);
	}
		
}

Viewing custom email settings

The code mentioned above will help us to create custom class with all settings and triggers. However, to be able to see the custom email settings that we created along with the default emails on WooCommerce Emails screen under WooCommerce > Settings > Emails, we’ll need to add this class to the default email classes in WooCommerce. In order to do that, we’ll make use of the woocommerce_email_classes filter to include custom email class to the default classes.

Add the following code to crwc-email-functions.php file (inside crwc-custom-emails directory).

<?php

add_filter( 'woocommerce_email_classes', 'crwc_custom_woocommerce_emails' );

function crwc_custom_woocommerce_emails( $email_classes ) {

	//* Custom welcome email to customer when purchasing online training program

	$upload_dir = wp_upload_dir();
	
	require_once( $upload_dir['basedir'] . '/crwc-custom-emails/class-crwc-welcome-email.php' );
	$email_classes['CRWC_Welcome_Email'] = new CRWC_Welcome_Email(); // add to the list of email classes that WooCommerce loads


	return $email_classes;
	
}

Now, when you navigate to WooCommerce > Settings > Emails, you should be able to see the custom email Welcome Email that we added to the list of emails on that page. If you click on the Configure button, you will find settings screen that allows you to enable/disable the email, edit/update the email subject and heading and choose the email content type since we added these settings in the custom class we created above.

Creating custom email template

Until this point, we have been able to create email class that helps create email trigger and set-up email content and we have also been able to add our custom email to the WooCommerce Emails screen. We still need to define the email template that will be used for the email content. The paths to the email content templates have already been defined in the custom email class we created above. Let’s add the actual content that will be used by the welcome email we send out to customers.

Add the following code to crwc-welcome-email.php file (inside emails directory).

<?php
/**
 *
 * Welcome email content template
 *
 * The file is prone to modifications after plugin upgrade or alike; customizations are advised via hooks/filters
 *
 */
 
if ( ! defined( 'ABSPATH' ) ) {
	exit;
}

/**
 * @hooked WC_Emails::email_header() Output the email header
 */
do_action( 'woocommerce_email_header', $email_heading, $email ); ?>

<p><?php _e( 'Thank you for your purchase of Online training course. Your account has been successfully created over the Online Training Program portal.', 'woocommerce' ); ?></p>

<p><?php _e( 'Use the following credentials to login to the portal:', 'woocommerce' ); ?></p>

<p>
	<strong><?php __( 'Login URL: ', 'woocommerce' ) ?></strong><?php _e( 'https://example.com' ); ?><br />
	<strong><?php __( 'Username: ', 'woocommerce' ) ?></strong><?php echo make_clickable( esc_attr( $order->billing_email ) ); ?><br />
</p>

<p><?php _e( 'Below are the order details for your reference.' ) ?></p>

<?php
/**
* @hooked WC_Emails::order_details() Shows the order details table.
* @hooked WC_Emails::order_schema_markup() Adds Schema.org markup.
* @since 2.5.0
*/
do_action( 'woocommerce_email_order_details', $order, $sent_to_admin, $plain_text, $email );

/**
* @hooked WC_Emails::order_meta() Shows order meta data.
*/
do_action( 'woocommerce_email_order_meta', $order, $sent_to_admin, $plain_text, $email );

/**
* @hooked WC_Emails::customer_details() Shows customer details
* @hooked WC_Emails::email_address() Shows email address
*/
do_action( 'woocommerce_email_customer_details', $order, $sent_to_admin, $plain_text, $email );

/**
 * @hooked WC_Emails::email_footer() Output the email footer
 */
do_action( 'woocommerce_email_footer', $email );

You can modify the email content template as required based on your specific requirements and accordingly, the details that you’d need to send out to your customers.

Start making Custom WooCommerce email work

We’re almost there with starting to send custom WooCommerce emails to the customers. All we need to do is to trigger our code. The filter we added to include our custom email class to list of default email classes is placed in crwc-email-functions.php, but hey!, wait a sec.. did we actually include it so that it is executed by WordPress? No, not yet. Let’s do that.

In order to do so, you can just add the following code to your theme’s functions.php:

$upload_dir = wp_upload_dir();

include_once( $upload_dir['basedir'] . '/crwc-custom-emails/crwc-email-functions.php' );

That’s it! Now on, when a customer purchases an online training product from your store, he would receive a welcome email with his credentials. Sounds good, right? Happy customers, happy you!

This tut has been updated to work with WooCommerce 3.0+. Read how can you add and send custom WooCommerce email for WooCommerce version 3.0 and higher.

Categories
Salesforce

Integrating eCommerce & Other Platforms with Salesforce — Part 2

This is the second part of the Salesforce integration series post which covers integration of LiveChat and Help Scout with Salesforce.

Integration with LiveChat:

LiveChat is an online customer service software with live support, help desk software and web analytics capabilities. It was first launched in 2002 and since then it is developed and offered in SaaS (software as a service) business model by LiveChat Software.

Documentation: https://developers.livechatinc.com/rest-api/

Request to get all chats:

Livechat give the response in pages so intially we need to make request with page=1 and get a total number of pages. Do the requests till you reach the last page.

[php]integer intPageCountFromBatch = 1;

Http objHttp = new Http();
HttpRequest request = new HttpRequest();
request.setMethod('GET');
Blob headerValue = Blob.valueOf('Livechatusername/email:apikey');
String authorizationHeader = 'Basic ' +&nbsp;&nbsp;&nbsp; EncodingUtil.base64Encode(headerValue);
request.setHeader('Authorization', authorizationHeader);
request.setHeader('Content-Type', 'application/json');
request.setHeader('X-API-Version','2');
request.setEndpoint('https://api.livechatinc.com/chats?page='+intPageCountFromBatch);
request.setTimeout(120000);
HttpResponse res = objHttp.send(request); &nbsp;

if (res.getStatus() == 'OK') {
&nbsp;&nbsp; &nbsp;Map&lt;String, Object&gt; mapResponse = (Map&lt;String, Object&gt;)JSON.deserializeUntyped(res.getBody());

&nbsp;&nbsp; &nbsp;if (mapResponse.containsKey('pages'))
&nbsp;&nbsp; &nbsp;&nbsp;&nbsp; &nbsp;intTotalPageCount = String.valueOf(mapResponse.get('pages')) != null ? Integer.valueOf(String.valueOf(mapResponse.get('pages'))) : 1 ;

&nbsp;&nbsp; &nbsp;List&lt;Object&gt; lstChatData =(List&lt;Object&gt;)mapResponse.get('chats');
}[/php]

IMP: You need to make callout till you reach the last page number.

Integration with Help Scout

Help Scout is a simple help desk designed for small businesses.

Documentation: http://developer.helpscout.net/help-desk-api/

[php]integer intPageCountFromBatch = 1;

Http objHttp = new Http();
HttpRequest request = new HttpRequest();
request.setMethod('GET');
Blob headerValue = Blob.valueOf('APIKey:Password');
String authorizationHeader = 'Basic ' + EncodingUtil.base64Encode(headerValue);
request.setHeader('Authorization', authorizationHeader);
request.setHeader('Content-Type', 'application/json');
request.setEndpoint('https://api.helpscout.net/v1/mailboxes/YourMailboxId/conversations.json?page='+intPageCountFromBatch); 

HttpResponse res = objHttp.send(request);
request.setTimeout(120000); 

if (res.getStatus() == 'OK') {
&nbsp;&nbsp; &nbsp;Map&lt;String, Object&gt; mapResponse = (Map&lt;String, Object&gt;)JSON.deserializeUntyped(res.getBody());

&nbsp;&nbsp; &nbsp;if (mapResponse.containsKey('pages'))
&nbsp;&nbsp; &nbsp;&nbsp;&nbsp; &nbsp;intTotalPageCount = String.valueOf(mapResponse.get('pages')) != null ? Integer.valueOf(String.valueOf(mapResponse.get('pages'))) : 1 ;

&nbsp;&nbsp; &nbsp;List&lt;Object&gt; lstChatData = (List&lt;Object&gt;)mapResponse.get('items');
}[/php]

IMP: You need to make callout till you reach the last page number.

For both LiveChat & Help Scout, you need to implement the batch chain logic.

Categories
WordPress

Category Specific Search on Category Archives in WordPress

Search form in WordPress comes in real handy when you’d like to allow users to navigate through your website content. If the site structure is not so intuitive or even otherwise, when a user wants to quickly look for something specific on your website, the search form is really helpful.

For developers, there’s whole bunch of awesomeness with the default search form because it has plenty of scope for customization via hooks and filters.

In this tutorial, we will tweak the default search form in WordPress to fetch search results specific to the category on a category archives page. This way, the visitors on your site will be able to make a category specific search on a category archive page such that the results are displayed from within that particular category.

Customizing the default search behavior

We will make use of the get_search_form filter to achieve the desired results. Tweaking the search form to restrict the results specific to a particular category involves passing additional parameters to the search form. Add the following code to your functions.php to implement the category specific search through search form.

<?php
add_filter( 'get_search_form', 'cr_category_specific_search', 10, 4 );
function cr_category_specific_search( $form, $text, $button, $label ) {
	// Only run on category archives
	if ( ! is_category() )
		return $form;

	// Get the current category from query variable
	$category_id = get_query_var( 'cat' );
	$category_data = get_category( $category_id );
	$category = $category_data->slug;

	// Get search query; allow users to filter the placeholder text when idle
	$text = get_search_query() ? apply_filters( 'the_search_query', get_search_query() ) : apply_filters( 'cr_search_text', __( 'Search this website', 'cloudredux' ) . ' &#x02026;' );

	// 'Submit' button label
	$button = apply_filters( 'cr_search_button_text', esc_attr__( 'Search', 'cloudredux' ) );

	// Input label
	$label = apply_filters( 'cr_search_input_label', '' );    
	$value_or_placeholder = ( get_search_query() == '' ) ? 'placeholder' : 'value';

	// Default behaviour for form inputs
	$onfocus = "if ('" . esc_js( $text ) . "' === this.value) {this.value = '';}";
	$onblur  = "if ('' === this.value) {this.value = '" . esc_js( $text ) . "';}";

	// Search form
	$form  = sprintf( '<form class="search-form" itemprop="potentialAction" itemscope="" itemtype="http://schema.org/SearchAction" method="get" action="%s" role="search">', home_url( '/' ) );

	if ( '' == $label )  {
		$label = apply_filters( 'cr_search_text', __( 'Search this website', 'cloudredux' ) );
	}    

	$form_id = uniqid( 'searchform-' );

	// Add category slug as a hidden field to implement category specific search
	$form .= sprintf(
		'<meta itemprop="target" content="%s"/><label class="search-form-label screen-reader-text" for="%s">%s</label><input itemprop="query-input" type="search" name="s" id="%s" %s="%s" /><input type="hidden" name="category_name" id="category_name" value="%s" /><input type="submit" value="%s" /></form>',
		home_url( '/?s={s}' ),
		esc_attr( $form_id ),
		esc_html( $label ),
		esc_attr( $form_id ),
		$value_or_placeholder,
		esc_attr( $text ),
		esc_attr( $category ),
		esc_attr( $button )
	);

	return $form;
}

Displaying the category specific search form to visitors

We have already configured our search form to display category specific search results. Just to let the users know that they have the ninja ability to search within a category on our site, we may want to add a search form to category archive pages and indicate by modifying the placeholder text to guide the users. Add the following code to your functions.php to display a search form on category archive pages.

add_filter( 'cr_search_text', 'cr_category_archive_search_form_text', 20 );
function cr_category_archive_search_form_text( $search_text ) {
	if ( ! is_category() ) {
		return $search_text;
	}

	return __( 'Search this Category', 'cloudredux' );
}
Categories
Salesforce

Integrating eCommerce & Other Platforms with Salesforce — Part 1

Recently I did custom Salesforce integration for with Shopify, Bill.Com, LiveChat, Helpscout, etc. The authentication request/response formats are crucial in such integration(s) as they establish the bridge between Salesforce and other platforms. Since I had a chance of working over it, I’m sharing it in this series of posts.

This part of the Salesforce integration series post covers Salesforce integration with Shopify and Bill.Com.

Integration with Shopify.com (using private app in Shopify)

Shopify is a complete eCommerce solution that allows you to set up an online store to sell your goods. It lets you organize your products, customize your storefront, accept credit card payments, track and respond to orders — all with a few clicks of the mouse.

Firstly you need to create a private app in Shopify.com which will generate the API key, password, and shared secret. We’ll need to use those keys for authentication purposes and while sending REST requests from Salesforce.

Here is the link to Shopify API Documentation: https://docs.shopify.com/api

Example:

Create customer in Shopify.com from Salesforce

API: https://help.shopify.com/api/reference/customer#create

POST Request from Salesforce:

JSONGenerator gen = JSON.createGenerator(true);
gen.writeStartObject();
    gen.writeFieldName('customer');
    gen.writeStartObject();
        gen.writeStringField('email', Contact.Email);        
        gen.writeStringField('first_name', Contact.FirstName);
        gen.writeStringField('last_name', Contact.LastName);             
    gen.writeEndObject();
gen.writeEndObject();

string strRequest = gen.getAsString();

Http objHttp = new Http();

HttpRequest request = new HttpRequest();
request.setMethod('POST');
Blob headerValue = Blob.valueOf('your apikey: your password');
String authorizationHeader = 'Basic ' + EncodingUtil.base64Encode(headerValue);
request.setHeader('Authorization', authorizationHeader);
request.setHeader('Content-Type', 'application/json');
request.setBody(strRequest);
request.setEndpoint('https://apikey:password@nameofyourshop.myshopify.com/admin/customers.json');

HttpResponse res = objHttp.send(request);

Map<String, Object> mapResponse = (Map<String,Object>)JSON.deserializeUntyped(res.getBody());

Map<String, Object> mapCustomerData = (Map<String, Object>)mapResponse.get('customer');

if(mapCustomerData .containskey('id'))
    system.debug('>>>Shopify='+string.valueof(mapCustomerData.get('id'));)

Integration with Bill.Com

Bill.com is a US-based cash flow management software system, provided as a software as a service that integrates with accounting and banking systems. It is intended to serve as a command and control dashboard for cash flow, by businesses, accounting firms, and banks.

Documentation: http://developer.bill.com/api-documentation/api/bill

Every API request needs a valid session ID, which is obtained by issuing a Login request. Login API takes in an organization ID, developer (or application) key, and user credentials (or Token), and returns a valid session ID, as well as an end-point URL, which should be used for any subsequent API requests. This session ID will remain valid for up to 35 minutes without activity. If the session becomes inactive, you will have to issue a new Login request and obtain a new session ID. You can explicitly end the session by issuing a Logout request.

You need username, password, OrganizationId, Devkey which can obtained from Bill.Com account / support.

Login Request:

String strLoginRequest = 'userName='+'Bill_com_Username'+'&password='+'Bill_com_Password'+'&orgId='+'Bill_com_OrgId'+'&devKey='+'Bill_com_Devkey'+';

HttpRequest objHttpReq = new HttpRequest();
objHttpReq.setHeader('Content-Type','application/x-www-form-urlencoded');
objHttpReq.setEndpoint('EndPOINTURL'+'/Login.json');
objHttpReq.setMethod('POST');
objHttpReq.setbody(strLoginRequest);

Http http = new Http();
HTTPResponse objHttpResp = http.send(objHttpReq);

if (objHttpResp.getStatusCode()==200) {
    Map<String,object> mapLoginResp = (Map<String,object>)JSON.deserializeUntyped(objHttpResp.getBody());
   
    if(mapLoginResp.containsKey('response_status') &&   Integer.valueOf(mapLoginResp.get('response_status'))==0) {
        if (mapLoginResp.containsKey('response_data') && mapLoginResp.get('response_data') instanceof map<string,object>) {   
            Map<String,Object> mapLoginRespData =  (Map<String,Object>)mapLoginResp.get('response_data');
   
            if(mapLoginRespData.containskey('apiEndPoint') ) {
                system.debug('>apiEndPoint='+string.valueof(mapLoginRespData.get('apiEndPoint')));
                system.debug('>sessionId='+string.valueof(mapLoginRespData.get('sessionId')));
                system.debug('>orgId='+string.valueof(mapLoginRespData.get('orgId')));
                system.debug('>usersId='+string.valueof(mapLoginRespData.get('usersId')));
            }
        }  
    }
}

The session ID, API endpoint is needed to use for making next requests:

Example:

Create Bill request:

HttpRequest objHttpReq = new HttpRequest();
objHttpReq.setEndpoint('ENDPOINTURL');
objHttpReq.setMethod('POST');
objHttpReq.setbody('devKey='+'DEVKEY'+'&sessionId='+'SESSION ID RECEIVED from LOGIN'+'&orgId='+'Bill_com_OrgId'+'&data='+'RequestBODY');
objHttpReq.setHeader('Content-Type','application/x-www-form-urlencoded');
Http http = new Http();
HTTPResponse objHttpResp = http.send(objHttpReq);
Categories
Salesforce

Overcoming Limited Feed Tracking in Salesforce

Recently I got a requirement where a client wanted feed tracking for every change that users are doing. Salesforce limits Feed Tracking to 20 fields per object.

I have used FieldSet and After Update trigger on object (for which we want to do feed tracking) to overcome the 20 field limit.

What is feed tracking?

The below Salesforce documentation link will explain in detail:
https://help.salesforce.com/apex/HTViewHelpDoc?id=collab_feed_tracking_overview.htm&language=en

Example: Account Feed tracking

IMP: Enable Feed Tracking by:
setup -> Chatter -> FeedTracking -> Select Account -> Click on Enable Feed Tracking

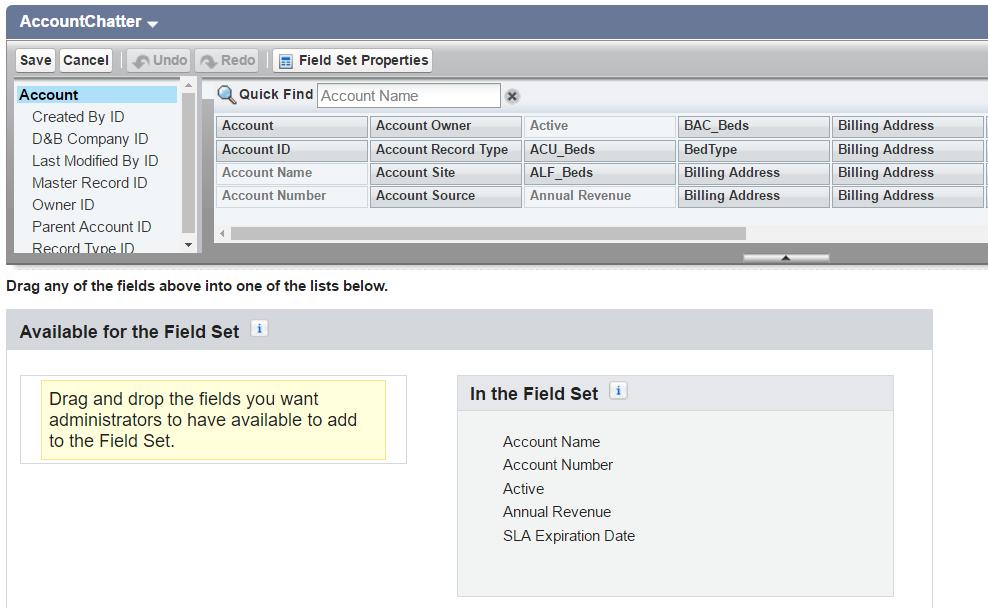
  1. Create field set on Account called AccountChatter. Add the fields you want to track in feed tracking.
  2. Create the following after update trigger on Account:

Add fields in FieldSet:

trigger AccountChatter on Account (after update) {
    List<Schema.FieldSetMember> lstTrackedFields = SObjectType.Account.FieldSets.AccountChatter.getFields();

    if (lstTrackedFields.isEmpty()) return;
    
    List<FeedItem> lstFieldChanges = new List<FeedItem>();
    
    if(!trigger.isUpdate) return;
    
    for (Account objNewAccount : trigger.new) {

        final Account oldAccount = trigger.oldmap.get(objNewAccount.Id); 
        // Iterate over all fields in Fieldset 
        for (Schema.FieldSetMember objField : lstTrackedFields) {
            String fieldName  = objField.getFieldPath();
            String fieldLabel = objField.getLabel();

            if (objNewAccount.get(fieldName) == oldAccount.get(fieldName))
                continue;

            String oldValue = String.valueOf(oldAccount.get(fieldName));
            String newValue = String.valueOf(objNewAccount.get(fieldName));

            if (oldValue != null && oldValue.length()>255) 
                oldValue = oldValue.substring(0,255);

            if (newValue != null && newValue.length()>255) 
                newValue = newValue.substring(0,255); 

            FeedItem post = new FeedItem();
            post.ParentId = objNewAccount.Id; // RecordId
            post.Body = UserInfo.getName()+' changed '+fieldLabel+' from '+oldValue +' to '+newValue ;

            lstFieldChanges.add(post);
        }
    }

    if (!lstFieldChanges.isEmpty()) insert lstFieldChanges;

}

Output:

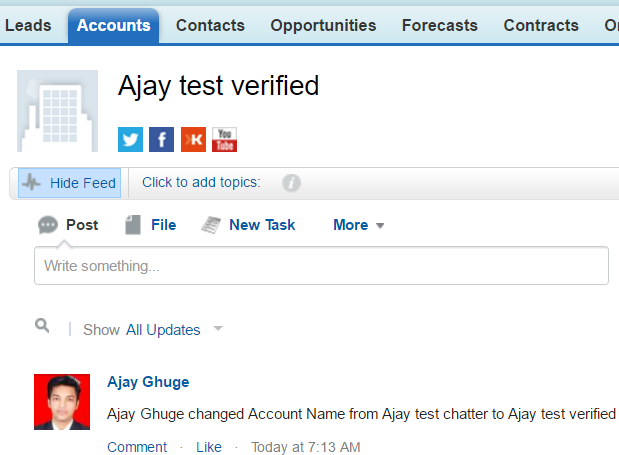
Create Record in Account with Name: Ajay test chatter

Now update the record with Name: Ajay test verified

The above solution has been implemented by taking idea from below post:
(To overcome the limit of History Tracking)
http://salesforce.stackexchange.com/questions/39956/what-is-the-best-workaround-for-the-20-field-history-tracking-cap

Happy Coding!!! Cheers!

Categories
Plugins WooCommerce

Introducing Multiple Notices – Product Notices for WooCommerce Plugin

Reports are coming from the plugin design facility at CloudRedux, we have resolved all the issues (were there any? not really!) faced by the users and also added some more features and updates to give you extended applications, flexibility, etc. Everything with an interactive and easy-to-use experience.

Before we get ahead to check out the new features, let’s first take a quick recap of what the Product Notices for WooCommerce by CloudRedux offers;

Product Notices for WooCommerce

Do you want to display a single notification, a worldwide notice, alerts, banners, notices on specific categories, etc on your WooCommerce website? Gain complete control over how your website displays notices, where they appear, and what they contain.

Notices draw attention to your website and its pages. Capture your users’ attention with a plugin that offers far more than typical alerts. Adding notices to your WooCommerce store is now under your control with Product Notices for WooCommerce!

Make your eCommerce website notices stand out more than ever! Highlight the most essential notifications or showcase discounts on all or any product page with the Product Notices for WooCommerce plugin.

Customizations

  • Global Notices – Notices that can be displayed throughout your e-store. You can create notices that will appear on all products across all categories. It might be an announcement, an alert, or any other information that you want your customers to see.
  • Product Notices – Notices that can be displayed on a per-product basis. The message could take the form of a promotion, discount, or anything else. This functionality also allows you to hide global notices, so you can have product-specific custom notices!

Appearance

Why stick to traditional notices, when you can have complete control over how your e-store will show its notices? Customize your product/global notices with a host of appearance options, like, border color, text color, and background color.

Simple Shortcodes to Display Notices

The plugin also features the function of displaying notices on your e-store using shortcodes. With shortcodes, you have the flexibility to display both a global and a specific-product notice on a certain page or post!

🎉 What’s new with Product Notices for WooCommerce version 1.3.0

Multiple Notices for Multiple Needs!

We understand that the product/service range is meant to be expanded, and that involves a lot more promotions, offers, discounts, etc. In short, a lot of notices spread across multiple products, categories, and tags.

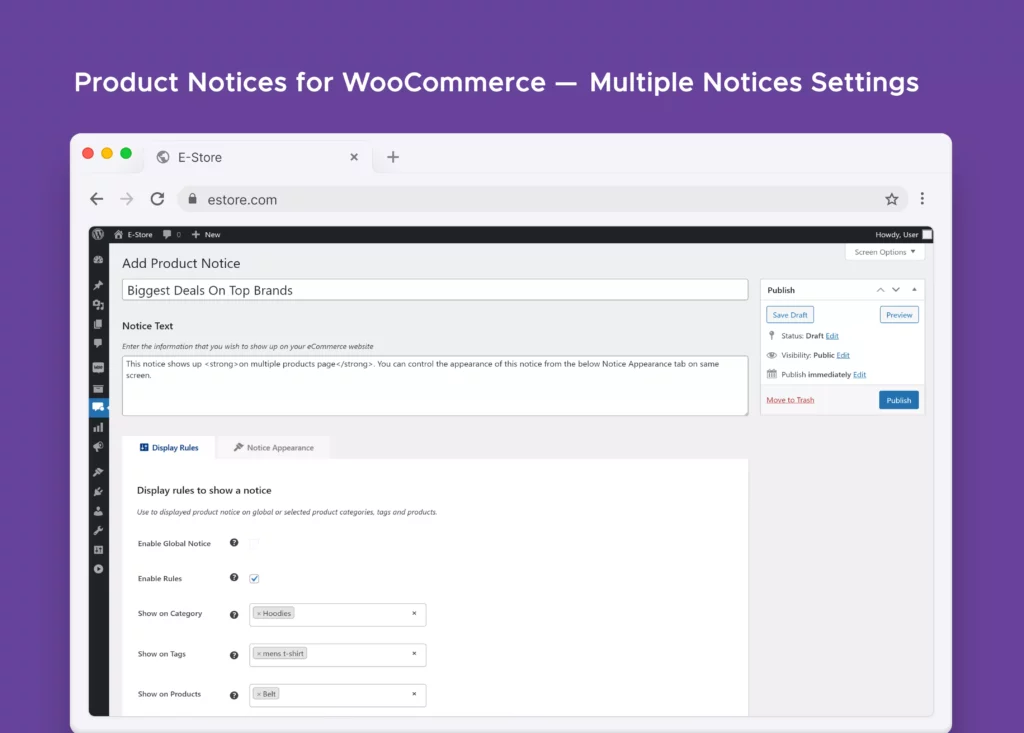
Now, you have a host of options to showcase notices on your e-store with the latest feature addition: Multiple Notices.

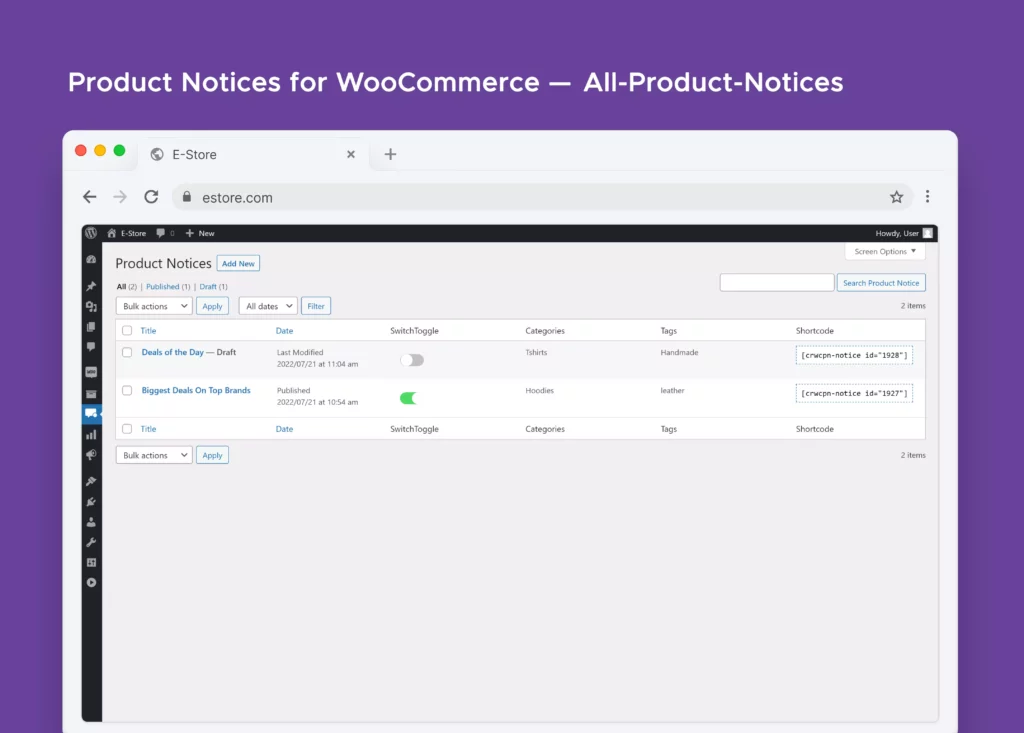
We believe this feature update will be the missing link to put your e-store out there with the best. Now, you can create and manage all notices on your e-store from one Dashboard. There are no limitations to the number of notices and no restrictions to managing all of them in one place, amazing, right?

It doesn’t end here as you can easily view and control every notice on your e-store in a data table format, with a dedicated on/off button per notice. Complete control at your disposal!

Shortcodes get more Intuitive

We received many feedback(s) and after thorough discussions, we decided to make shortcodes more intuitive. Now, at the Product Notices Dashboard, you can easily copy any shortcode with a simple click, and it’s copied to the clipboard. You can use it for any notice, it’s that intuitive!

Appearance Updates

Don’t worry, we haven’t kept the design aspect of the notices on the sideline. Now, along with all the available appearance options, you also get control over the border-radius. Custom design for notices on your WooCommerce store….Check!

We’re just Starting!

We’re just starting with updates, as we’ve already got a few more surprises coming in, along with many unique plugins. Yes, we’re soon going to release some more plugins that will make your WordPress experience more accessible and engaging.

Do tell us your thoughts about this feature update of Product Notices for WooCommerce

Note: To learn more about how to set up global, product notices, and more, you can also visit our WordPress.org page and get started on creating custom notices for your WooCommerce store!